
Setup your IPTV list on TVIP Box?
The TVIP Box console fulfills all contemporary expectations of a multimedia device, supports for streaming media and video on demand (VOD), The TVIP Box console provides high-quality playback of digital channels, and grants access to a wide array of OTT content, encompassing platforms like YouTube, and Picasa, online entertainment, weather forecasts, social networking, and more, alongside featuring a built-in web browser. What is an internet streaming IPTV server?
TVIP bears a striking resemblance to MAG boxes and in some ways replicates the embedded software found in MAG devices. What is a MAG device?

How we can add the IPTV list to the TVIP device (New version)
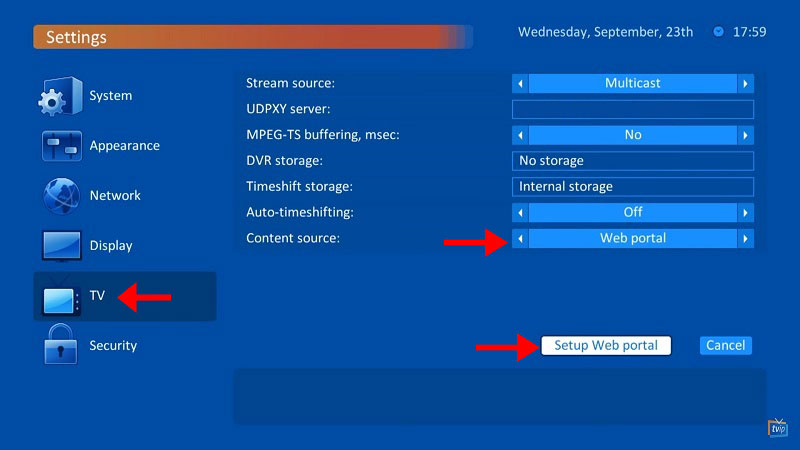
Step 1: Upon starting the TVIP box, configure primary settings such as language and time, Begin from the main menu, navigate downwards to locate the “Settings” option, then select “TV,” as illustrated in the image below.

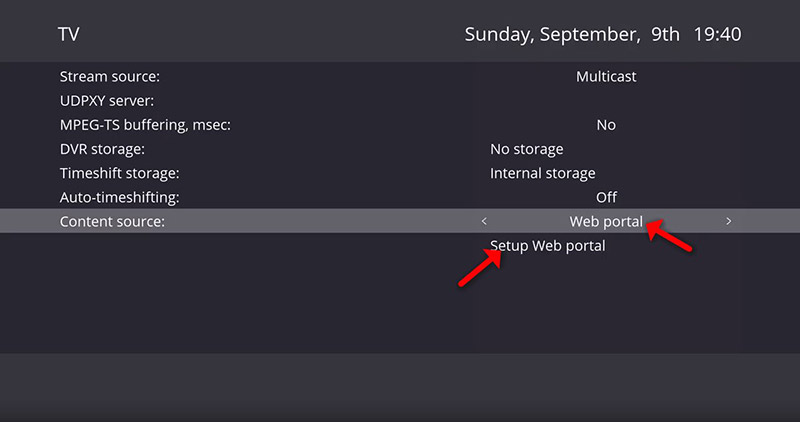
Step 2: Next, switch the Content source to “Web portal” and proceed to click on “Setup Web portal”.
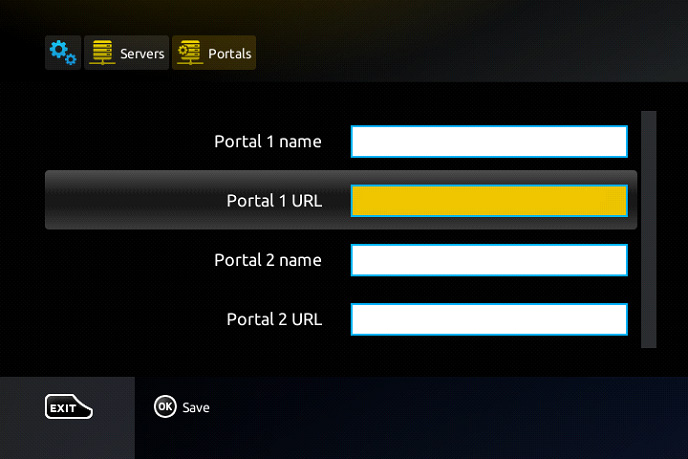
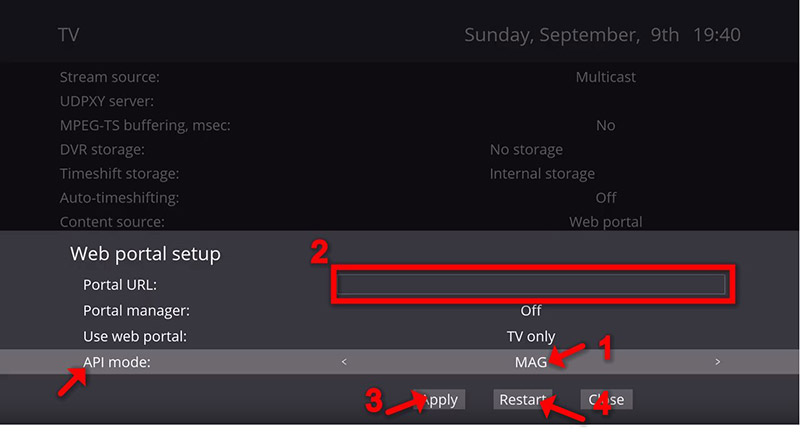
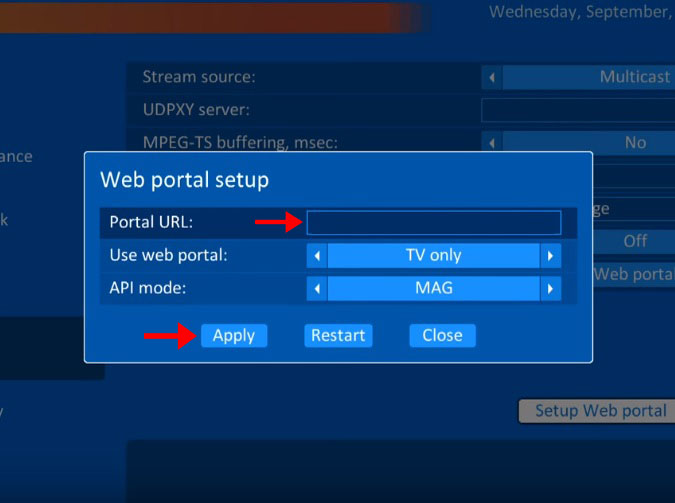
Step 3: Start by switching the API Mode to “MAG” or, if unavailable, select “GSTB” API. Next, input your portal server address into the “Portal URL” field. You can obtain this information from your IPTV distributor. Then, click on “Apply” followed by “Restart.”
Note: If the “MAG” API is not available in your settings, opt for the “GSTB” API.
Next, you’ll need to provide your device’s MAC address to your IPTV dashboard or share it with your IPTV distributor. What is a MAC address? The progressive IPTV providers offer a dashboard where you can add the MAC address to your line yourself.
Note: You can locate the TVIP Box’s MAC address on the back of the device.
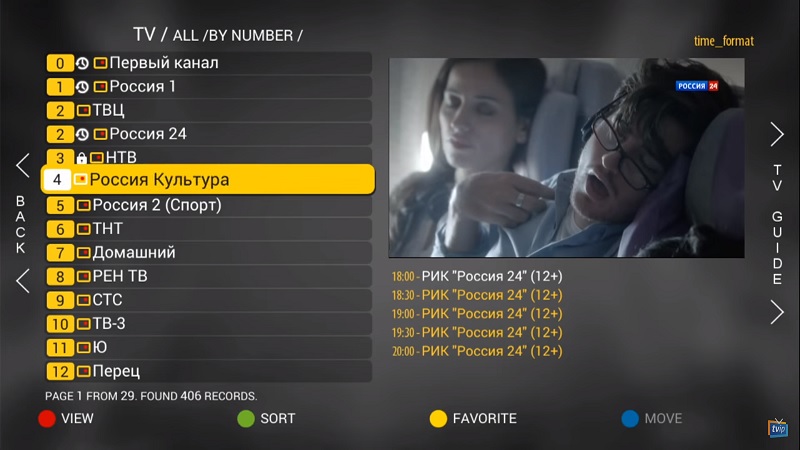
Step 4: Once you’ve restarted the box, navigate to the main menu and select “Watch TV.” Please be patient as the portal loads your playlist. This process may take a few minutes.
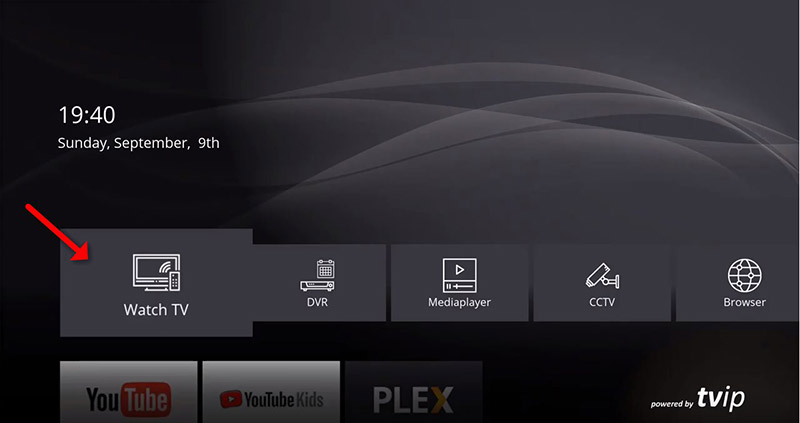
Step 5: Once the setup is complete, the channels will appear automatically, allowing you to select any desired channel and start streaming effortlessly.
Adding IPTV channels to your TVIP Box using an M3U URL
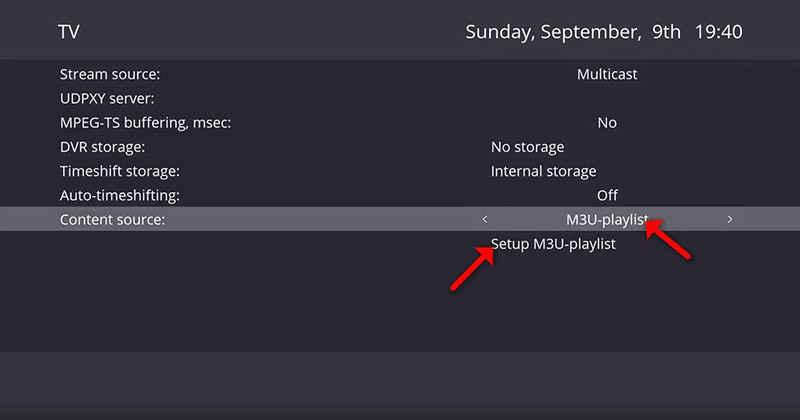
In Step 2 of the tutorial, switch the Content source to “M3U-playlist” and proceed by selecting “Setup M3U-playlist“.
Enter the M3U URL provided by your IPTV provider in the designated field, then click “Apply” followed by “Restart” to finalize the setup.
To add IPTV channels to your TVIP Box (Old Version)
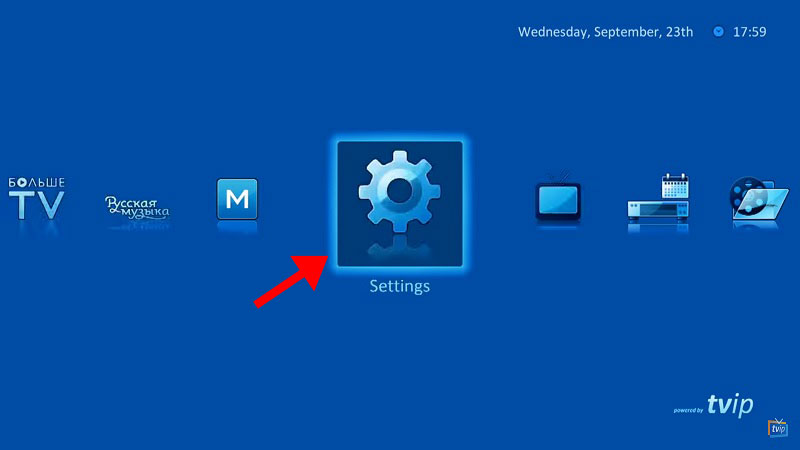
Step 1: Begin by navigating to the main menu of your TVIP Box. From there, select the “Settings” option, typically represented by a gear icon, as shown in the image below.
Step 2: On the right menu, locate and select the “TV” icon. Then, on the right side, change the Content source to “Web portal” and proceed by clicking on “Setup Web portal“.
Step 3: In the “Portal URL” field, enter your portal server address. If you don’t have this information, you can obtain it from your IPTV distributor. Once entered, click on “Apply” to save the settings.
Certainly! In the realm of IPTV (Internet Protocol television), your device’s MAC (Media Access Control) address serves as a unique identifier necessary for connecting to the IPTV service. When setting up your IPTV service, you’ll typically be prompted to input this MAC address either directly into your IPTV dashboard if you’re managing your service online, or you can provide it to your IPTV distributor who will then handle the setup process for you. This MAC address acts as a sort of digital fingerprint for your device, ensuring that it’s authorized to access the IPTV service and enabling seamless communication between your device and the service provider’s network.
Certainly! Note that the MAC address for your TVIP box, a crucial piece of information for configuring your IPTV service, can typically be found on the back of the box itself. It’s usually printed on a label or etched into the casing. This MAC address serves as a unique identifier for your TVIP box within the network and is necessary for setting up your IPTV service. By locating this MAC address on your TVIP box, you can proceed with entering it into your IPTV dashboard or providing it to your service provider as needed for seamless connectivity and access to your IPTV channels and content.
Step 4: Once you’ve added your portal server address, you’ll need to wait for the portal to load your playlist. This process may take a few minutes as the system retrieves the necessary information from the server. Be patient during this time and allow the portal to complete loading your playlist. Once loaded, you should have access to your IPTV channels and content through your TVIP Box.

Step 5: Once you’ve added the portal URL, the channels will automatically populate on your TVIP Box. You’ll see a list of available channels on your screen. Simply navigate through the list using your remote control and select the desired channel to start streaming. Enjoy watching your favorite content hassle-free!
Certainly! Here are some features of the TVIP Box
- Middle Product Operation: The TVIP Box operates effectively with middle products such as Stalker.
- IPTV Portal Support: It supports IPTV portal operation, providing access to various IPTV services.
- Customization Options: Clients can customize middle products using C++ API or HTML5/JS API according to their preferences.
- Playlist Compatibility: Users can easily use M3U playlists without the need for additional middleware.
- Media Player with USB/LAN Support: The TVIP Box includes a media player that supports playback from USB and LAN-connected devices.
- Custom Android APK Support: Users can customize and install Android APKs tailored to their needs.
- Windows Sharing (Samba): It supports sharing media files with Windows devices via the Samba protocol.
- External Storage Support: External USB and SD cards are supported for expanded storage options.
- File System Compatibility: Supports various file systems including FAT16/32, NTFS (read), NFS, ext2, and ext3.
- Streaming Media Protocol Support: Supports streaming media protocols such as RTSP, RTP, UDP, IGMP, and HTTP.
- Timeshift Capability: Users can pause and rewind live TV using a USB drive or SD card for timeshift functionality.
- TV Guide Support: Includes support for Electronic Program Guide (EPG) formats such as Xmltv and JTV.
- Air Mouse Compatibility: Supports air mouse devices for easier navigation and control of the TVIP Box interface.
Powerful CPU
TVIP media centers are equipped with cutting-edge System-on-Chip (SoC) technology featuring powerful multi-core CPUs. This ensures that users can seamlessly enjoy a wide range of modern multimedia applications, both those currently available and those that will emerge in the coming years. With such robust hardware capabilities, TVIP media centers offer unparalleled performance and versatility, providing users with an immersive entertainment experience that is future-proof and adaptable to evolving technological advancements.
USB support
Every TVIP S-Box comes equipped with a USB-host connection, allowing users to connect a variety of external devices such as flash drives, HDDs, keyboards, and wireless remotes. With this feature, users can conveniently access and play videos or music directly from an external hard drive or flash card, enhancing their overall viewing experience.
Moreover, TVIP S-BOX supports a wide range of media formats including AVI, MKV, MP4, and many others. Additionally, it offers support for multichannel audio and subtitles, ensuring compatibility with diverse multimedia content preferences. This versatility enables users to enjoy their favorite media files with ease and convenience on their TVIP S-Box device.
High-quality WiFi
TVIP media centers offer diverse connectivity options to cater to various networking needs:
- WiFi 2.4 GHz: This option provides wireless connectivity on the 2.4 GHz frequency band, suitable for environments with standard WiFi networks and devices.
- WiFi 2.4/5 GHz: With support for both 2.4 GHz and 5 GHz frequency bands, users can enjoy enhanced wireless performance and flexibility. This option is ideal for environments with dual-band routers and devices, offering improved speed and reliability for streaming and other networking tasks.
Smart Remote with Learning Functionality
TVIP media centers are designed with user convenience and durability in mind. Featuring sturdy plastic construction and soft rubber buttons, the remote control offers both reliability and comfort. The tactile feedback of the buttons ensures easy navigation and operation, while the durable materials ensure longevity, making it an ideal choice for daily use.
Setting up your TVIP media center is a breeze, with a fast and straightforward process that gets you up and running in no time. The remote control boasts a learning function specifically designed for TV control, allowing you to effortlessly program it to operate your television. What’s more, the learning setup remains intact even after changing the batteries, ensuring that you won’t need to reprogram the remote every time you replace the batteries. This ensures a hassle-free and convenient experience for users, making TVIP media centers a top choice for seamless entertainment control.