Blog Page

Blogs

Setup your IPTV list on TVIP Box?

The TVIP Box console fulfills all contemporary expectations of a multimedia device, supports for streaming media and video on demand (VOD), The TVIP Box console provides high-quality playback of digital channels, and grants access to a wide array of OTT content, encompassing platforms like YouTube, and Picasa, online entertainment, weather forecasts, social networking, and more, alongside featuring a built-in web browser. What is an internet streaming IPTV server?

TVIP bears a striking resemblance to MAG boxes and in some ways replicates the embedded software found in MAG devices. What is a MAG device?

How we can add the IPTV list to the TVIP device (New version)

If you possess newer TVIP boxes such as the 605 or 615 models, this tutorial will be applicable for your use, However, if your box is an older version like the 410, you’ll either need to update the TVIP box operating system or follow the tutorial intended for older versions.

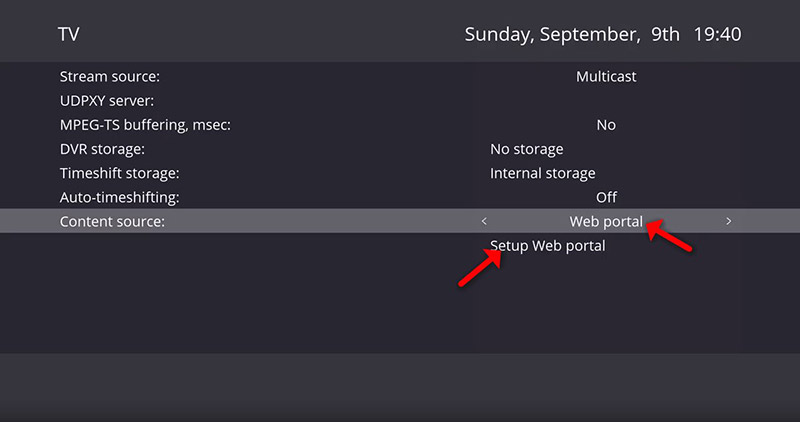
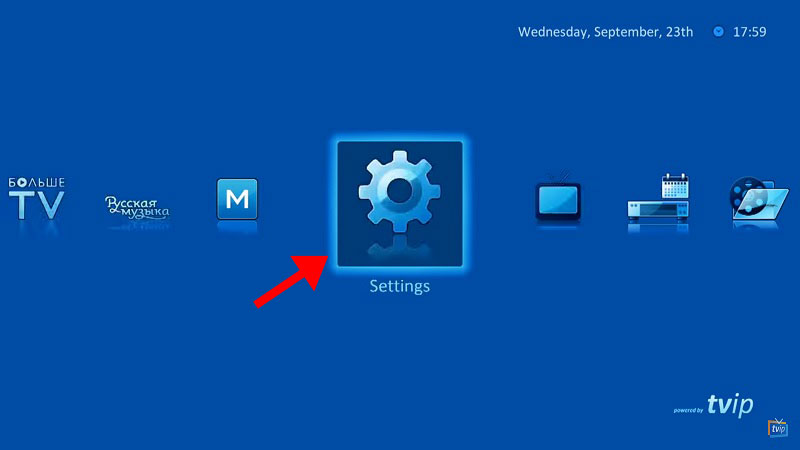
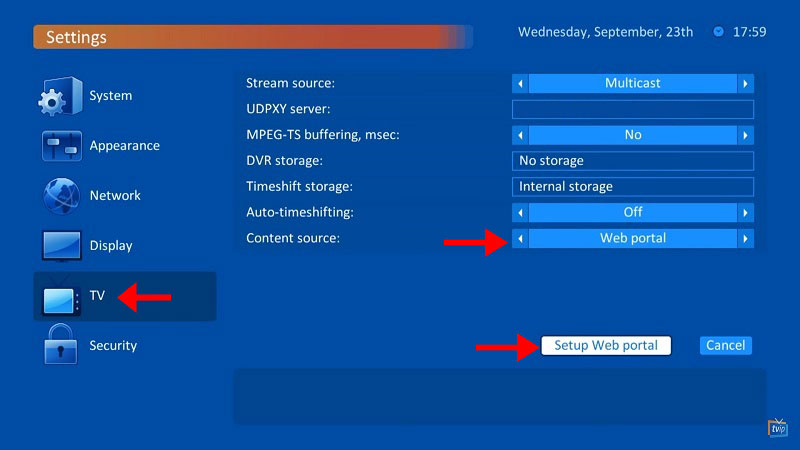
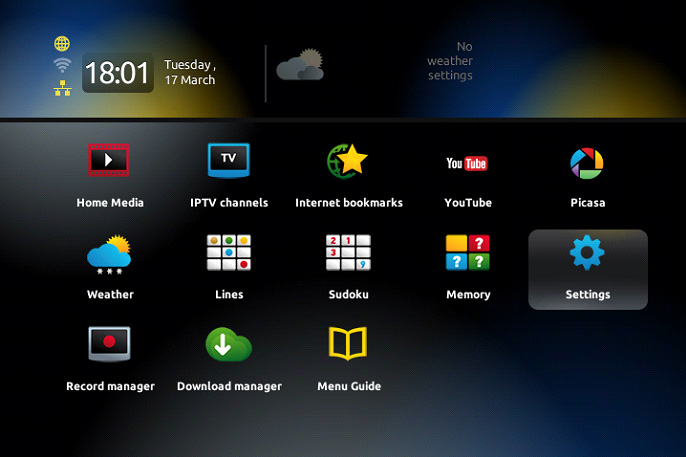
Step 1: Upon starting the TVIP box, configure primary settings such as language and time, Begin from the main menu, navigate downwards to locate the “Settings” option, then select “TV,” as illustrated in the image below.

Step 2: Next, switch the Content source to “Web portal” and proceed to click on “Setup Web portal”.

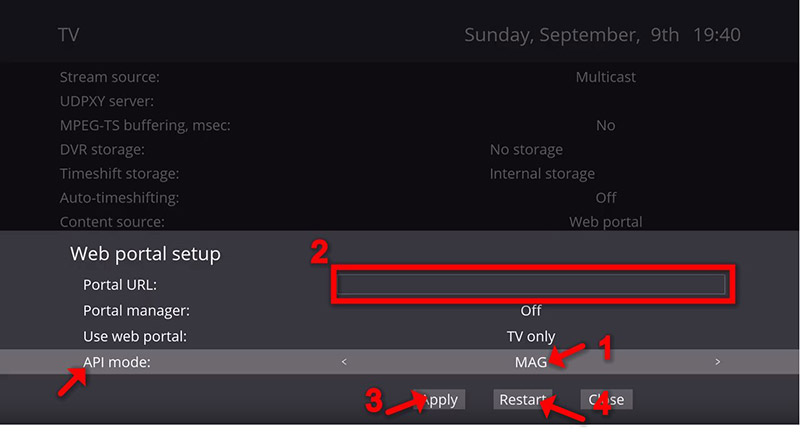
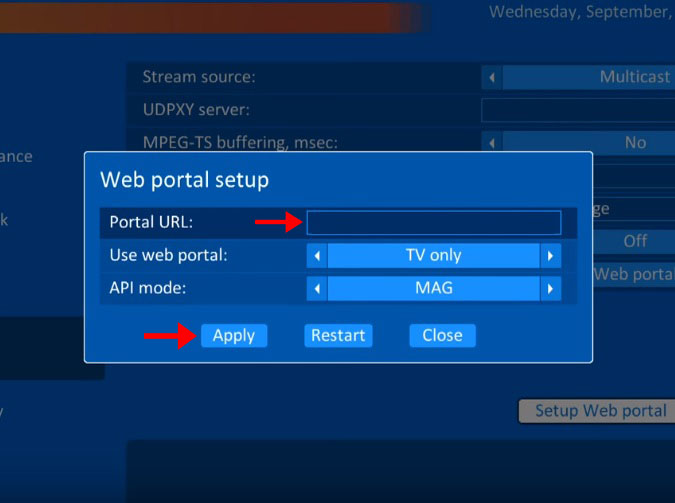
Step 3: Start by switching the API Mode to “MAG” or, if unavailable, select “GSTB” API. Next, input your portal server address into the “Portal URL” field. You can obtain this information from your IPTV distributor. Then, click on “Apply” followed by “Restart.”

Note: If the “MAG” API is not available in your settings, opt for the “GSTB” API.

Next, you’ll need to provide your device’s MAC address to your IPTV dashboard or share it with your IPTV distributor. What is a MAC address? The progressive IPTV providers offer a dashboard where you can add the MAC address to your line yourself.

Note: You can locate the TVIP Box’s MAC address on the back of the device.

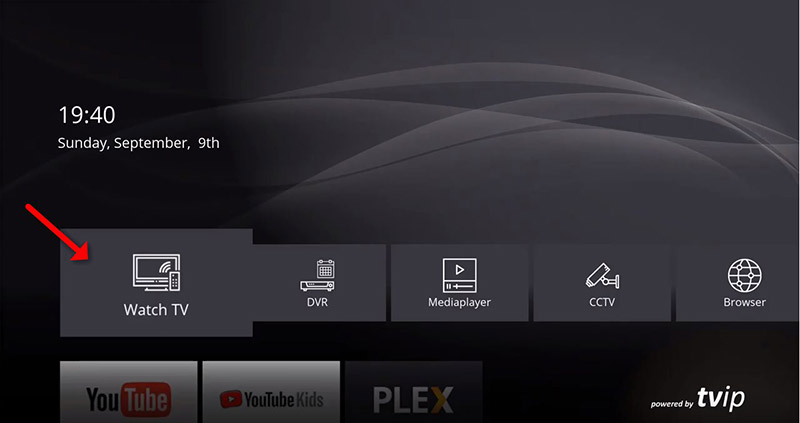
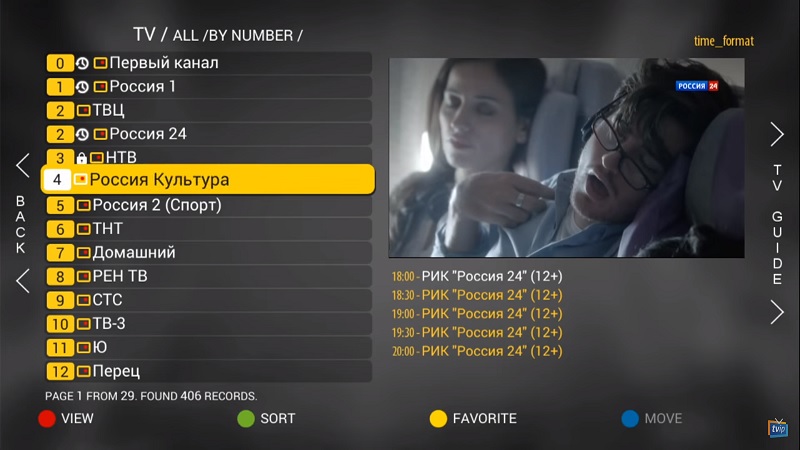
Step 4: Once you’ve restarted the box, navigate to the main menu and select “Watch TV.” Please be patient as the portal loads your playlist. This process may take a few minutes.

Step 5: Once the setup is complete, the channels will appear automatically, allowing you to select any desired channel and start streaming effortlessly.

Adding IPTV channels to your TVIP Box using an M3U URL

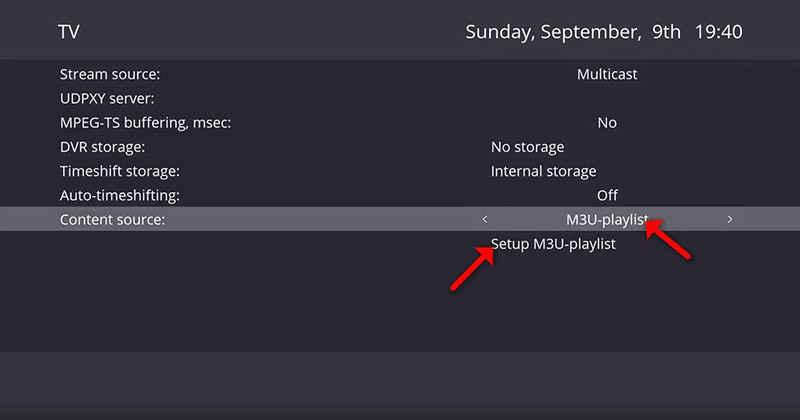
In Step 2 of the tutorial, switch the Content source to “M3U-playlist” and proceed by selecting “Setup M3U-playlist“.

Enter the M3U URL provided by your IPTV provider in the designated field, then click “Apply” followed by “Restart” to finalize the setup.

To add IPTV channels to your TVIP Box (Old Version)

Step 1: Begin by navigating to the main menu of your TVIP Box. From there, select the “Settings” option, typically represented by a gear icon, as shown in the image below.

Step 2: On the right menu, locate and select the “TV” icon. Then, on the right side, change the Content source to “Web portal” and proceed by clicking on “Setup Web portal“.

Step 3: In the “Portal URL” field, enter your portal server address. If you don’t have this information, you can obtain it from your IPTV distributor. Once entered, click on “Apply” to save the settings.

Certainly! In the realm of IPTV (Internet Protocol television), your device’s MAC (Media Access Control) address serves as a unique identifier necessary for connecting to the IPTV service. When setting up your IPTV service, you’ll typically be prompted to input this MAC address either directly into your IPTV dashboard if you’re managing your service online, or you can provide it to your IPTV distributor who will then handle the setup process for you. This MAC address acts as a sort of digital fingerprint for your device, ensuring that it’s authorized to access the IPTV service and enabling seamless communication between your device and the service provider’s network.

Certainly! Note that the MAC address for your TVIP box, a crucial piece of information for configuring your IPTV service, can typically be found on the back of the box itself. It’s usually printed on a label or etched into the casing. This MAC address serves as a unique identifier for your TVIP box within the network and is necessary for setting up your IPTV service. By locating this MAC address on your TVIP box, you can proceed with entering it into your IPTV dashboard or providing it to your service provider as needed for seamless connectivity and access to your IPTV channels and content.

Step 4: Once you’ve added your portal server address, you’ll need to wait for the portal to load your playlist. This process may take a few minutes as the system retrieves the necessary information from the server. Be patient during this time and allow the portal to complete loading your playlist. Once loaded, you should have access to your IPTV channels and content through your TVIP Box.

Step 5: Once you’ve added the portal URL, the channels will automatically populate on your TVIP Box. You’ll see a list of available channels on your screen. Simply navigate through the list using your remote control and select the desired channel to start streaming. Enjoy watching your favorite content hassle-free!

Certainly! Here are some features of the TVIP Box

  • Middle Product Operation: The TVIP Box operates effectively with middle products such as Stalker.
  • IPTV Portal Support: It supports IPTV portal operation, providing access to various IPTV services.
  • Customization Options: Clients can customize middle products using C++ API or HTML5/JS API according to their preferences.
  • Playlist Compatibility: Users can easily use M3U playlists without the need for additional middleware.
  • Media Player with USB/LAN Support: The TVIP Box includes a media player that supports playback from USB and LAN-connected devices.
  • Custom Android APK Support: Users can customize and install Android APKs tailored to their needs.
  • Windows Sharing (Samba): It supports sharing media files with Windows devices via the Samba protocol.
  • External Storage Support: External USB and SD cards are supported for expanded storage options.
  • File System Compatibility: Supports various file systems including FAT16/32, NTFS (read), NFS, ext2, and ext3.
  • Streaming Media Protocol Support: Supports streaming media protocols such as RTSP, RTP, UDP, IGMP, and HTTP.
  • Timeshift Capability: Users can pause and rewind live TV using a USB drive or SD card for timeshift functionality.
  • TV Guide Support: Includes support for Electronic Program Guide (EPG) formats such as Xmltv and JTV.
  • Air Mouse Compatibility: Supports air mouse devices for easier navigation and control of the TVIP Box interface.

Powerful CPU

TVIP media centers are equipped with cutting-edge System-on-Chip (SoC) technology featuring powerful multi-core CPUs. This ensures that users can seamlessly enjoy a wide range of modern multimedia applications, both those currently available and those that will emerge in the coming years. With such robust hardware capabilities, TVIP media centers offer unparalleled performance and versatility, providing users with an immersive entertainment experience that is future-proof and adaptable to evolving technological advancements.

USB support

Every TVIP S-Box comes equipped with a USB-host connection, allowing users to connect a variety of external devices such as flash drives, HDDs, keyboards, and wireless remotes. With this feature, users can conveniently access and play videos or music directly from an external hard drive or flash card, enhancing their overall viewing experience.

Moreover, TVIP S-BOX supports a wide range of media formats including AVI, MKV, MP4, and many others. Additionally, it offers support for multichannel audio and subtitles, ensuring compatibility with diverse multimedia content preferences. This versatility enables users to enjoy their favorite media files with ease and convenience on their TVIP S-Box device.

High-quality WiFi

TVIP media centers offer diverse connectivity options to cater to various networking needs:

  1. WiFi 2.4 GHz: This option provides wireless connectivity on the 2.4 GHz frequency band, suitable for environments with standard WiFi networks and devices.
  2. WiFi 2.4/5 GHz: With support for both 2.4 GHz and 5 GHz frequency bands, users can enjoy enhanced wireless performance and flexibility. This option is ideal for environments with dual-band routers and devices, offering improved speed and reliability for streaming and other networking tasks.

Smart Remote with Learning Functionality

TVIP media centers are designed with user convenience and durability in mind. Featuring sturdy plastic construction and soft rubber buttons, the remote control offers both reliability and comfort. The tactile feedback of the buttons ensures easy navigation and operation, while the durable materials ensure longevity, making it an ideal choice for daily use.

Setting up your TVIP media center is a breeze, with a fast and straightforward process that gets you up and running in no time. The remote control boasts a learning function specifically designed for TV control, allowing you to effortlessly program it to operate your television. What’s more, the learning setup remains intact even after changing the batteries, ensuring that you won’t need to reprogram the remote every time you replace the batteries. This ensures a hassle-free and convenient experience for users, making TVIP media centers a top choice for seamless entertainment control.

If i have an old TV, how can I still access IPTV services?

To achieve this, you need to connect your television to an external apparatus referred to as an IPTV Media Box or Set-Top Box (STB), which links your TV to the internet while also acting as an IPTV receiver. The market offers a wide range of renowned IPTV Media Boxes, including but not limited to the Android box, MAG box, Enigma box, Apple TV box, and Roku.

As televisions evolve, they are equipped with increasingly intelligent features, leaving owners of older models without access to smart functionalities and applications. Nevertheless, a variety of streaming media players are available that can transform these older televisions into smart TVs. Among these devices are the Apple TV, Roku Premier, Amazon FireTV, Nvidia Shield TV, Google Chromecast, among others.

Setup boxes

The sole method to upgrade an old TV into a smart version involves employing a set-top box. Integrating a set-top box with an older television not only provides access to IPTV channels but also introduces a broader range of features and options.

Android setup boxes

For instance, with an Android box, you gain access to the Google Play Store, allowing you to download and enjoy thousands of Android games directly on your TV. Among the top choices for a setup box that offers both IPTV channels and the ability to play Android games stands the Nvidia Shield. It even includes a Gamepad or controller, significantly enhancing the gaming experience on Android.

iOS setup boxes

These set-top boxes empower users to use an HDTV for streaming videos, music, and podcasts, in addition to downloading apps and games from the App Store. In this ecosystem, AppleTV emerges as the premier choice, encompassing all the functionalities provided by an Android box and more. It further distinguishes itself with a remote that incorporates voice control via Siri, a touchpad, and an accelerometer and gyroscope for gaming, positioning it as a superior alternative compared to other platforms.

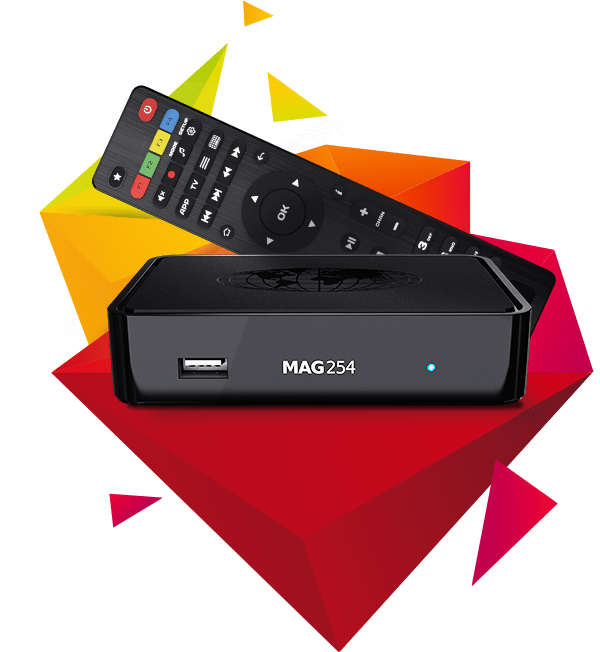
MAG boxes

Infomir’s MAG series stands out as one of the leading IPTV devices globally. Since 2007, Infomir has been manufacturing Set-Top Boxes under the MAG brand name. These devices are versatile, enabling users to efficiently manage their media content and access IPTV services. The most recent MAG box models are equipped with an Android operating system. However, it’s important to verify that your IPTV provider is compatible with these newer versions.

Connecting a set-top box to your TV

Setting this up is straightforward and uncomplicated:

  • Place the TV Box in the same room as your TV monitor.
  • Plug your set-top box into a power source.
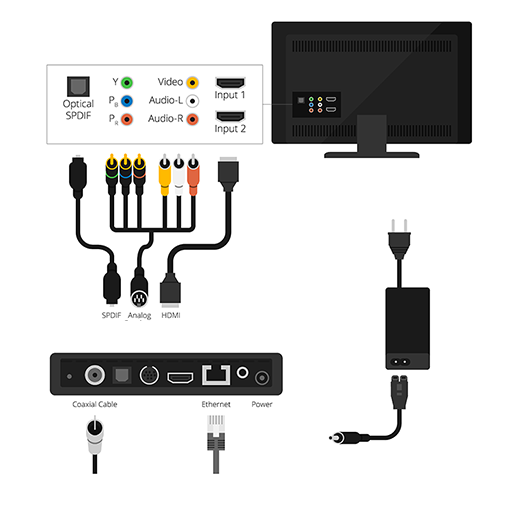
  • Use an HDMI cable to connect the TV Box to an available HDMI port on your TV.
  • Power on your TV and change the input to the corresponding HDMI port.
  • Connect your set-top box to the internet using either WiFi or a cable connection.
  • Switch on your set-top box and allow it some time to start up. Following these steps will enable you to enjoy IPTV channels on your OLD TV.

How Setting up IPTV on a MAG Box step?

In this guide, we’ll walk you through the process of accessing IPTV channels on your MAG device, step by step.

Setting Up IPTV on Your MAG Device: A Step-by-Step Guide

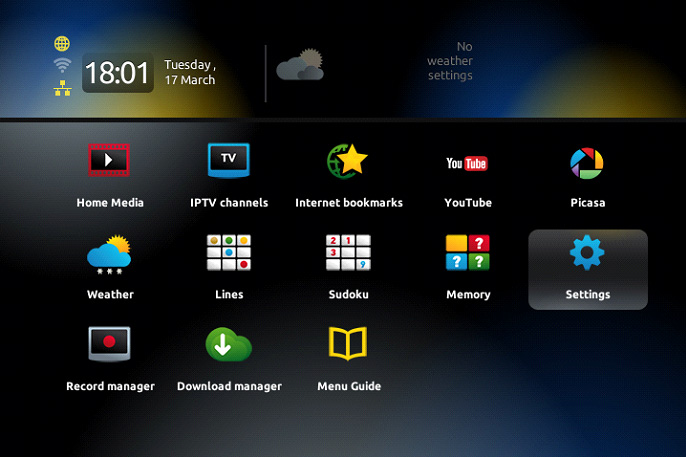
Step 1: As your MAG box loads, the main portal screen will appear. At this point, navigate to ‘Settings’ by pressing the ‘SETUP/SET‘ button on your remote control.
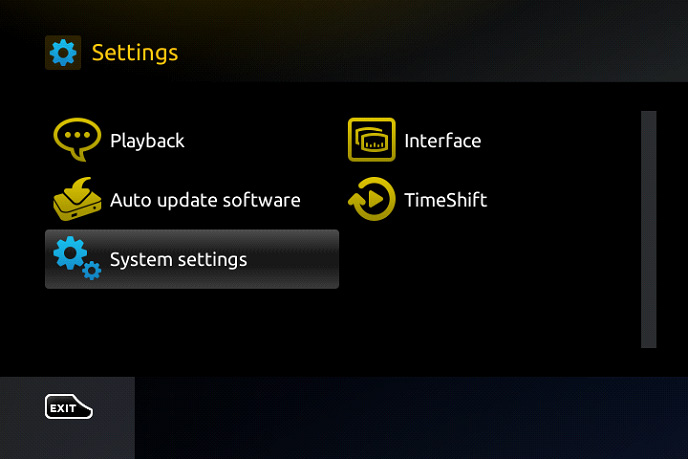
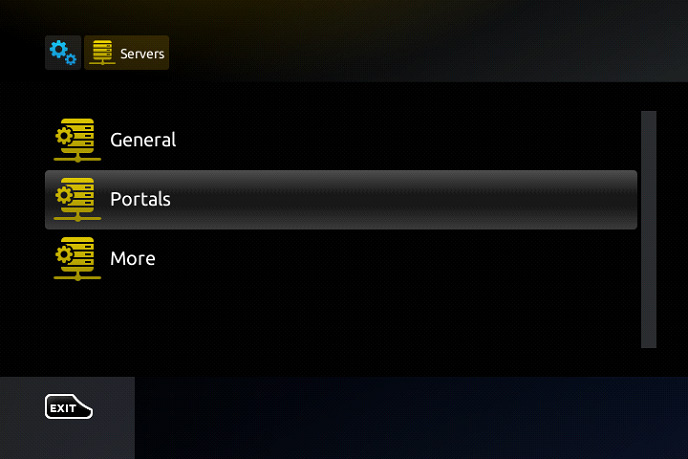
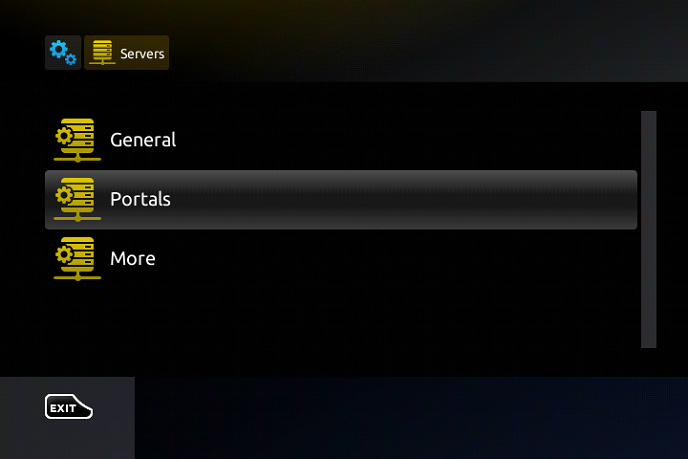
Step 2: Next, navigate to “System Settings” and select “Servers“.

 Step 3: Choose “Portals” from the menu.

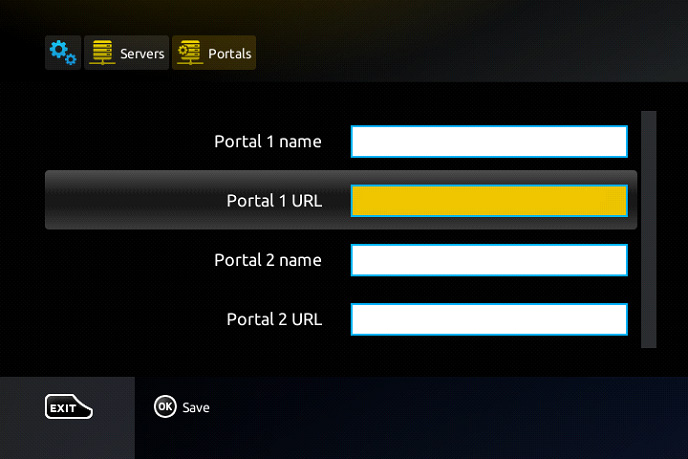
Step 4: Enter “IPTV” in the “Portal 1 name” field.
In the “Portal 1 URL” enter the portal address provided by your IPTV distributor. First, you must provide your device Mac address which can be found on the back side of your box to your IPTV distributor.

Step 5: When all the operations listed above is done, then press “OK”.
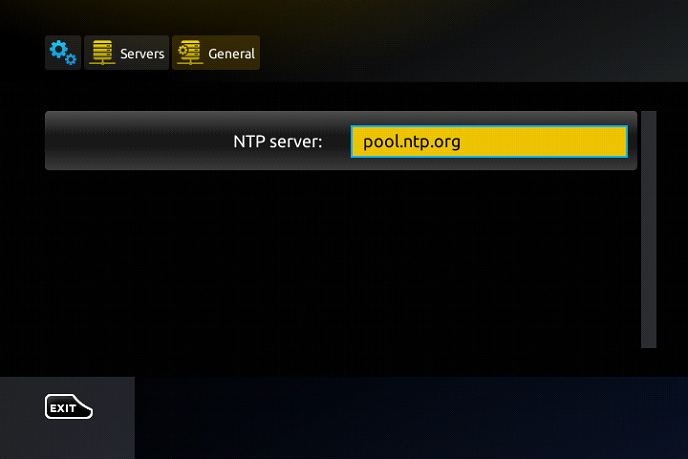
When the settings are being saved click “EXIT” on the remote control and press option “General”.
In the “NTP server,” line enter the following address “pool.ntp.org or us.pool.ntp.org“ for North America.

Press “OK” to save the changes you made.

When all the steps listed above are done press”EXIT” 2 times on the remote control and restart the portal.
Now everything is ready to start watching Live TV…

How to change Portal address on MAG?

Sometimes you may require changing your portal address to another IPTV provider and the steps below will guide you through the entire process of changing your portal address on your MAG box.

How to Change the Portal Address

Turn off the box and remove its power line, then unplug the cable between the box and the router.

Turn on the box without the cable to the modem.
Wait until you see the “Loading Portal” on the screen.
On the remote control press the “SET” button.
Go to the Settings and press “OK“.

Press the “SET” button on the remote control again.
Go down to Servers and press “OK“.

Go to the Portal 1 URL and delete ALL the text (to delete use the back button on the remote).
Press the “KB” button on the top right on the remote. It is like a keyboard picture.
Enter the new portal address.
Press the “KB” button on the remote so the keyboard goes OFF the screen, go down the bottom of the screen and select “OK“.
Plug in the Cable that goes from the box to the modem, then go to reload portal or restart TV Box using the power supply.

How to setup IPTV on MAG with M3U url?

This tutorial, we are going to show you how to bring IPTV channels to your MAG 4XX and 5XX ( MAG410, MAG420, MAG425, MAG500, MAG520, MAG524 and etc) device.

Note: IPTV providers do not support MAG 4XX and 5XX with portal system and this setup is the alternative solution to bring IPTV to your MAG box.

How to setup IPTV on MAG Box with Portal?

How to use M3U url to setup IPTV MAG

Step 1: Download the M3U url which provided by the IPTV provider.

Step 2: Copy/paste this static M3U file to a USB storage.

Step 3: Insert the USB storage to your MAG.

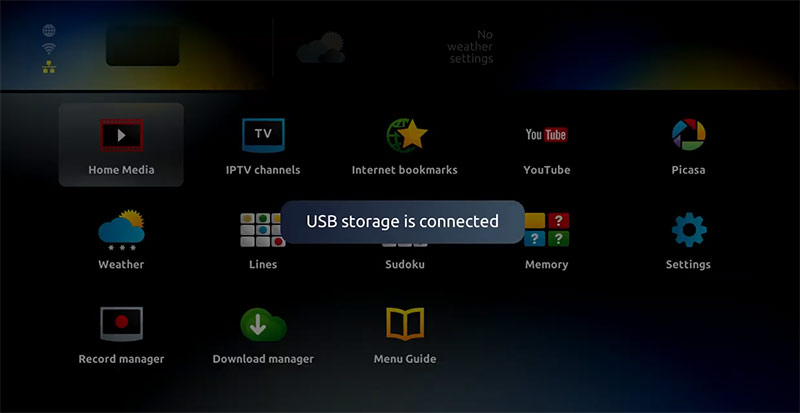
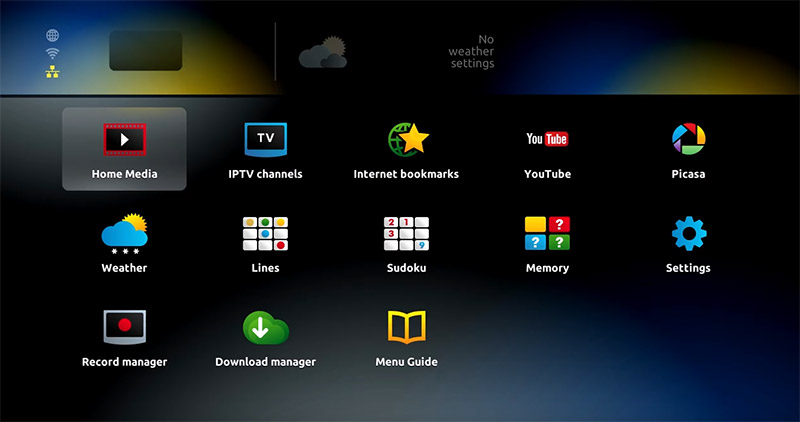
Step 4: Once mag box shows the login screen click on embedded portal.

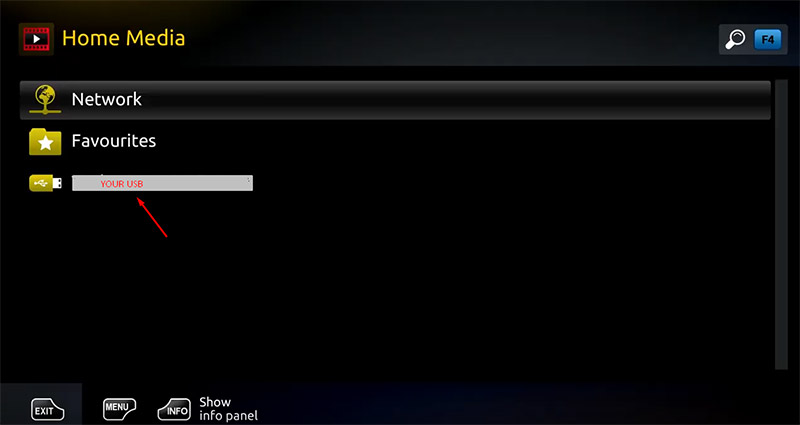
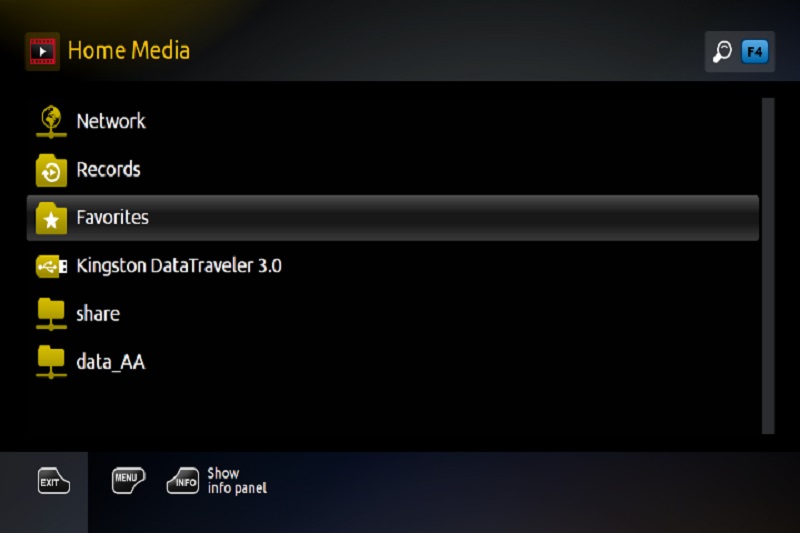
Step 5: Click on Home Media.

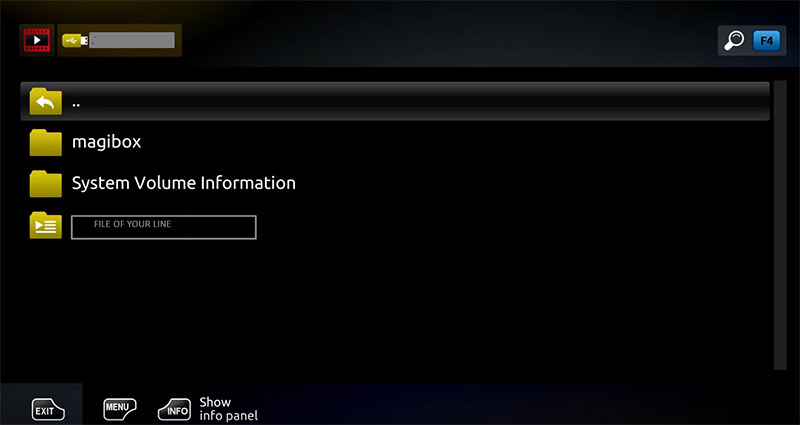
Step 6: Scroll down and click on your USB.

Step 7: Find and click on the M3U file in the USB storage.

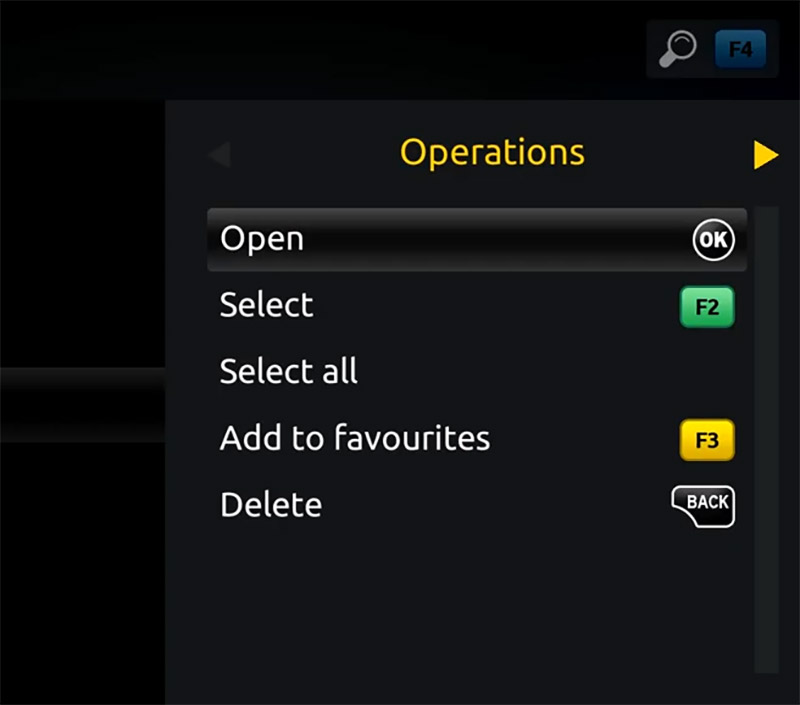
Step 7: Click “Open”.

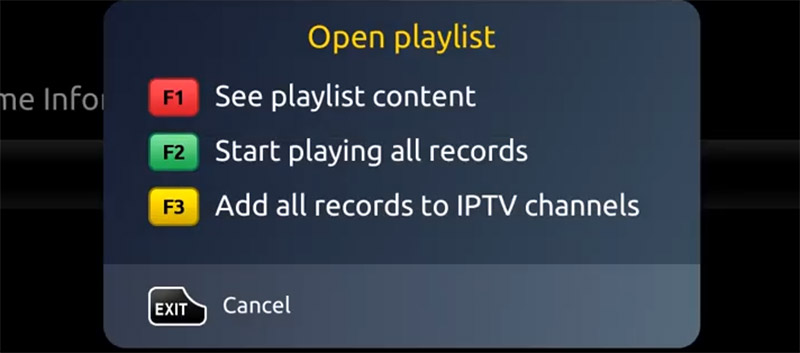
Step 8: A window will appear saying *Open playlist* , Now use F3 (yellow button on remote).

Step 9: The m3u file is added to the IPTV section of the Home Media section.

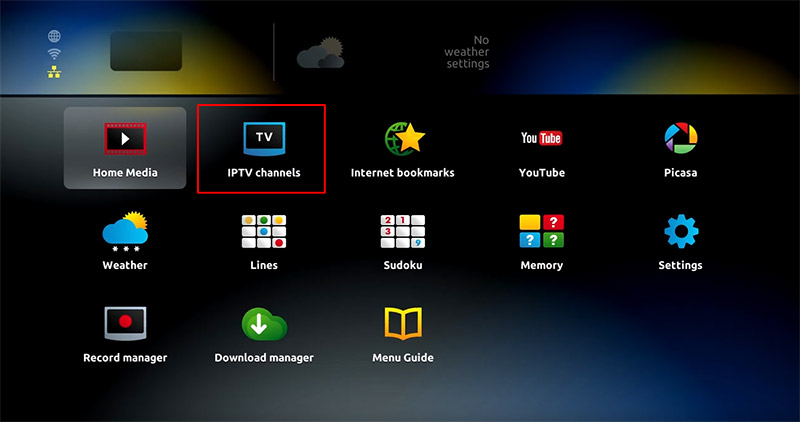
Step 10: Use “Back” button to return to the portal page and to “IPTV channels”

Now everything is ready to start watching Live TV…

What is MAC address on MAG Box?

MAC, an acronym of Media Access Control address, is a unique feature which identifies device manufacturers’ registered number and will be usable when the device has to be utilized in network environments.

Each MAG device is specified with a particular MAC address that should be registered in the servers of the IPTV provider.

Privileged IPTV providers give you a dashboard to can edit your IPTV subscription, in the dashboard you can Add the MAC.
And if there is not any dashboard, need to contact IPTV provider about this case.

If the users want to change their MAG device, use another MAG device, the new MAC address has to be replaced by the old one in the servers. How to setup IPTV on MAG?

Where to find the MAC address

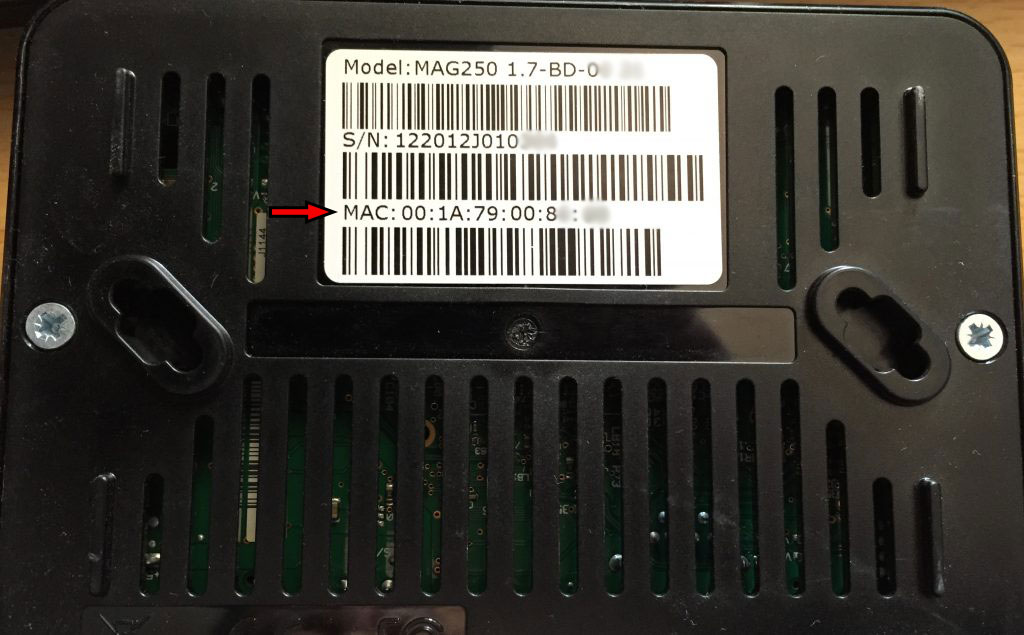
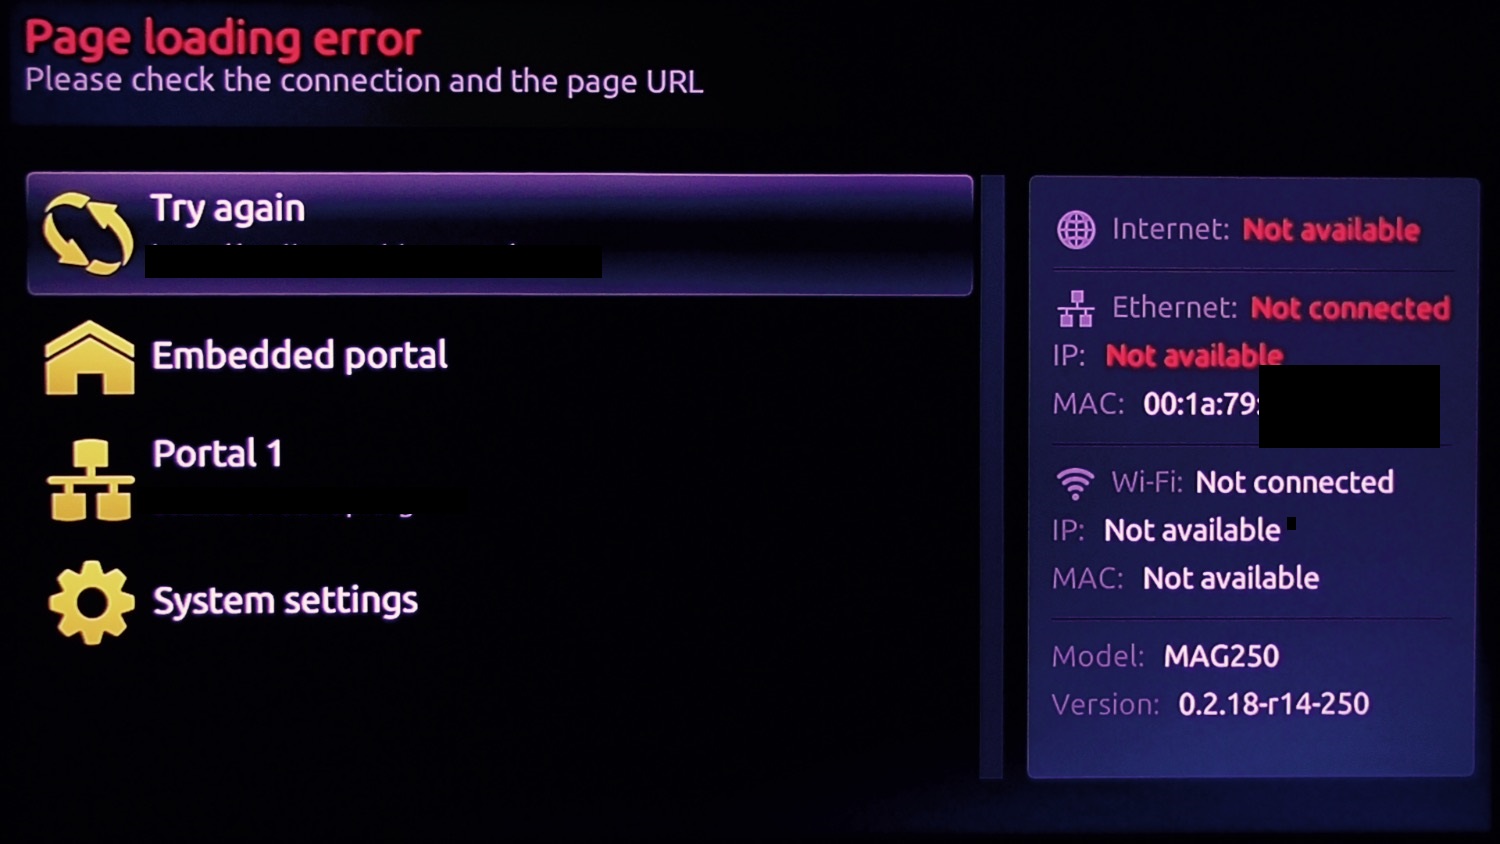
In order to find the MAC address of your MAG box, simply turn the box around and you can find the MAC address on the backside of your device. The Mac address usually starts with 00:1A:79 and the rest of the numbers and characters are exclusive to each box.

How to update MAG?

Sometimes the best way to fix an issue is to update the MAG box to the latest version of the released firmware. The below instructions will guide you through on how to update your MAG box firmware.

How to update Firmware of the MAG box

Disconnect the MAG box from the internet.
Reset the MAG box.
Wait until you can see the “Page Loading Error”  on the screen.
Plug-in the Internet cable to the box.
By selecting the Embedded Portal, the box will be updated with the latest version.
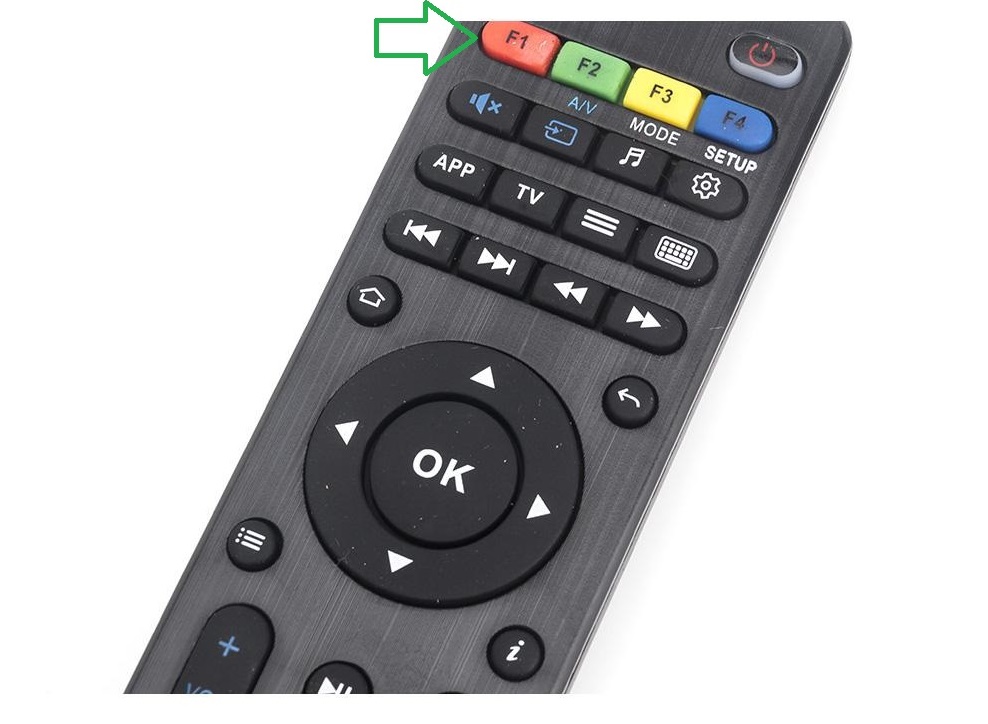
If the automatic update does not start, press the SET button on the remote, select “software update”, press OK and then press the F1 button.

Some of the MAG devices lose the portal settings after updating the device to the latest version of system software and this will not allow the clients to add any portal addresses to the device.

In this method, we will teach you how to downgrade the system software to the latest version via a USB drive.

How to update MAG via USB

In order to update STB from System settings via a USB:

Step 1: Make sure that your USB drive matches the requirements.

Step 2: Download the required SW image file (imageupdate).
Note. Latest version of Factory SW image is accessible on manufacturer’s server: http://update.infomir.com/mag/<model>/imageupdate (<model> – number of STB model). For example, for MAG322: http://update.infomir.com/mag/322/imageupdate

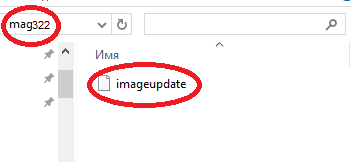
Step 3: Createdirectory mag<model> in the root of the USB drive and write “imageupdate” file to this directoryFor instance, for the MAG322 directory name: mag322.

Step 4: Connect prepared USB-drive to STB. You can use any USB connector of STB: both rear or front.

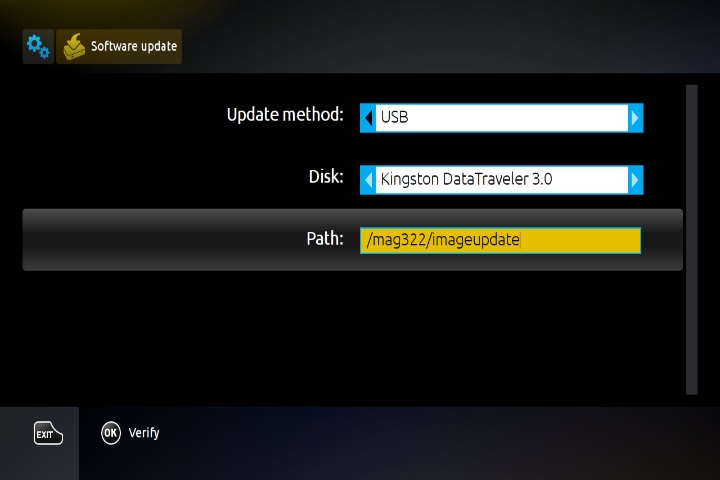
Step 5: Open Settings⇒ System settings ⇒ Software update.

Step 6: In Software update window set Update method = USB. You can see two new strings:

  • Disk – name of USB-drive;
  • Path – Path to update file on the USB-drive.

Step 7: Select Verify (OK) to make sure that STB can detect “imageupdate” file.

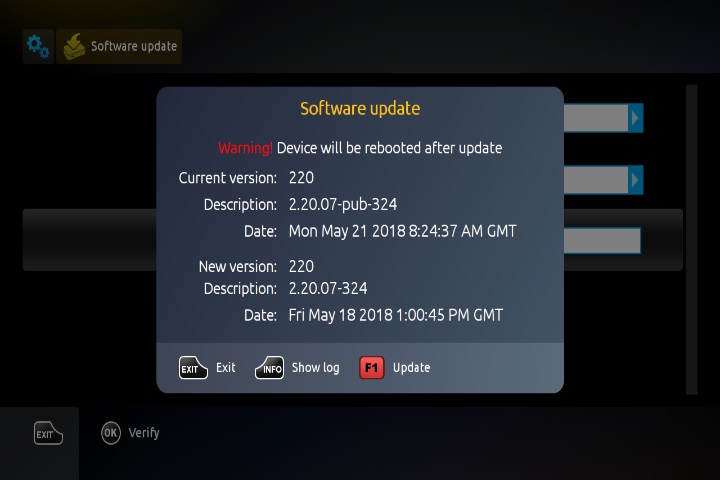
Step 8: If the file is detected and readable successfully you’ll see Software Update window.

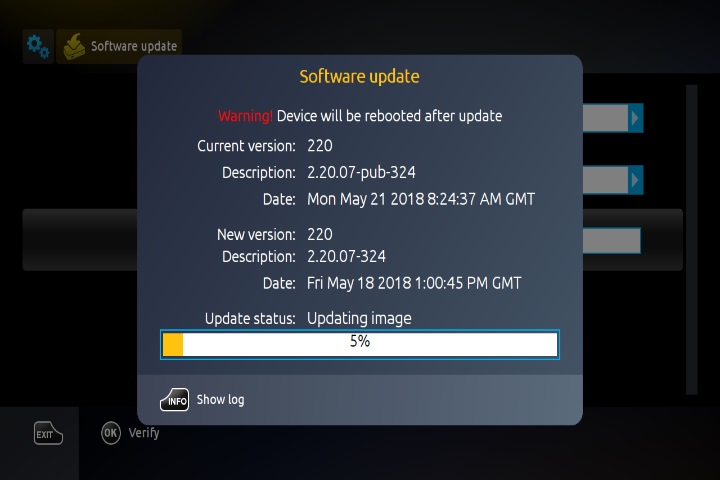
Step 9: In the Software Update window displays descriptions of the firmware versions: the Current version (operating in STB) and New version (available on a USB drive).

Step 10: Select subsequent operation after comparing Current and New versions:

  • To reject update push Exit.
  • To start update push Update (F1).

Step 11: The status of the software update is displayed by the progress bar and comments. To view the log of update user may push Show log (Info on RC).

Step 12: Wait until the update process is complete. After completing the update, the STB automatically reboots.
Note. Do not turn off STB and plug off USB drive until the end of the update.

MAG Box Problems

We usually face with some specific issues in MAG boxes.
The 2 prevalent error messages we meet are:

  • STB blocked or Black Screen
  • Page Loading Error
  • Loading bar stuck

In this article we are gong to solve these problems.

How to setup a MAG box?

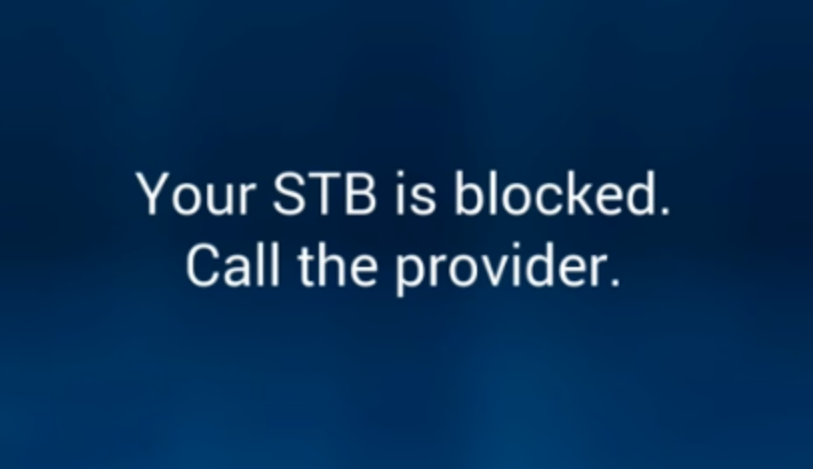
STB blocked (Black Screen)

STB blocked on MAG happens for various types of reasons. we are going to make a list and explain all of the possible reasons.
Note: Recently in some MAG boxes we have only a Black Screen instead of STB blocked error message.

MAC address didn’t add to the subscription or Removed

For MAG boxes it’s necessary to add the box MAC to the IPTV subscription. What is MAC address in MAG devices?
Privileged IPTV providers give you a dashboard to can edit your IPTV subscription, in the dashboard you can add the MAC or check if it’s still on subscription or not.
And if there is not any dashboard, need to contact IPTV provider about this case.

Adding a wrong MAC address

If you somehow by a mistake add a wrong MAC address to your IPTV dashboard, there is a 100% chance you might see this error on your screen.So we highly suggest you double check every character and number you added to your panel from the back side of your MAG device.

Line expired

If your IPTV subscription is expired, you will face the STB blocked (Black Screen) error on your screen. So head back to your IPTV dashboard and double check if your subscription is expired or not and extend the line if it’s expired.

Line disabled

IPTV providers block (disable) the subscriptions which use in more than allowed devices simultaneously. So should check the line by IPTV service if it has been blocked or not.

ISP blockage

One more reason that STB blocked (Black Screen) error might occur is ISP blockage. In this case, we suggest you contact your Internet Service Provider and ask for further information. You can also try with another internet connection such as a 4G connection from your phone to make sure about this issue.
The last solution for ISP blockage is using a reliable VPN service, but please note that for MAG boxes you need special router to install VPN on it.

Adding a wrong portal address

Exactly identical to the first reason, if you add a wrong portal address to your MAG box, there is a 100% chance that you might see this error again. Now find out the correct portal address by asking from your IPTV provider and it to your MAG device. How can I change the portal address in the MAG box?

Page Loading Error

Mostly this problem occurs because of a problem in internet connection.

On the Page Loading Error Screen, it will say “Ethernet Link: UP” if all is ok or “DOWN” if the Ethernet port is not connected to the router. In addition, it would be possible that your Internet connection does not work well, so you have to check whether Internet access is available.

How to solve this Issue

Firstly this error usually occurs as a result of the lack of Internet connection to the setup box. you need to be sure that the Ethernet cable between your STB and the router is plugged.

The LAN light on the router port which is connected to the back of your STB has to be lit. Also, check the connection on the back of the setup box itself, there should be 2 lights on the connection itself where the cable is plugged into the setup box, one orange and the other is green.
If either the light on the router or the lights on the STB ports do not lit, there should be a connection issue and it is highly recommended to change the Ethernet cable.

If even after these changes the problem still exists, the next step is to unplug both the router and setup box power cables. After unplugging, plug back the router power cable at first and after two minutes plug in the STB power cable.

If your router places in one room and your setup box is in another room and connected to the router via the Ethernet line, please check the lights on the sockets. If this is not lighted, the power line has lost its wireless connection to the router and you will need to reboot both the router and then the power line.

Once the light is back, you have to reboot the setup boxtoo. If the light is lit and the STB is still stuck on the loading screen, you need to make sure that the power line has the LAN light on the front.

Loading bar stuck on the MAG box

Sometimes when the users try to switch a loading message appears on the screen. This issue can be tackled by rebooting both the modem and the STB.

How to set Date and Time on MAG device?

Setting up time and date on your MAG box is an important step towards setting up your IPTV subscription on your MAG box. This will allow the EPG to be displayed properly based on your local time.

How to set up Time and Date on MAG

On your remote control, press “OK” to get the channel list appears.
Press “Exit” on the remote (it places near the arrows).
Go to “Settings“.
Press  “OK“.
Go to localization and here you can update the time settings.
Go back to Servers and enter “pool.ntp.org
Once done, it should be updated within 24 hours.

How to add channels to Favorite list on MAG?

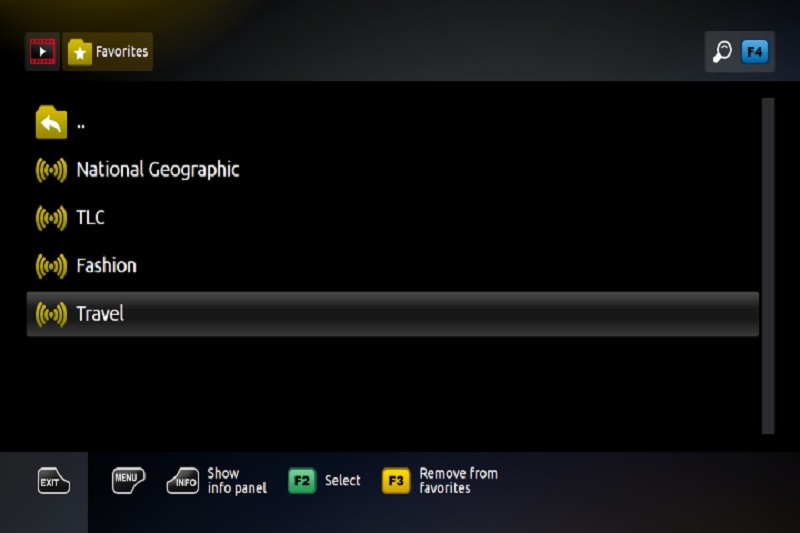
In this tutorial, we are going to show you how to add IPTV channels to your favorites list on MAG device. The Favorites feature presents STB users with the capability to instantly access pre-selected IPTV channels on the MAG box. What is MAG?

How to add channels to favorites

Channels selection to Favorites may be fulfilled from the next:

  • from channel list of IPTV channel window;
  • from m3u-playlist on a USB drive or Network resources – its shortcuts are located in Home media.

To add a particular channel of IPTV playlist window to Favorites:

  • Select the channel.
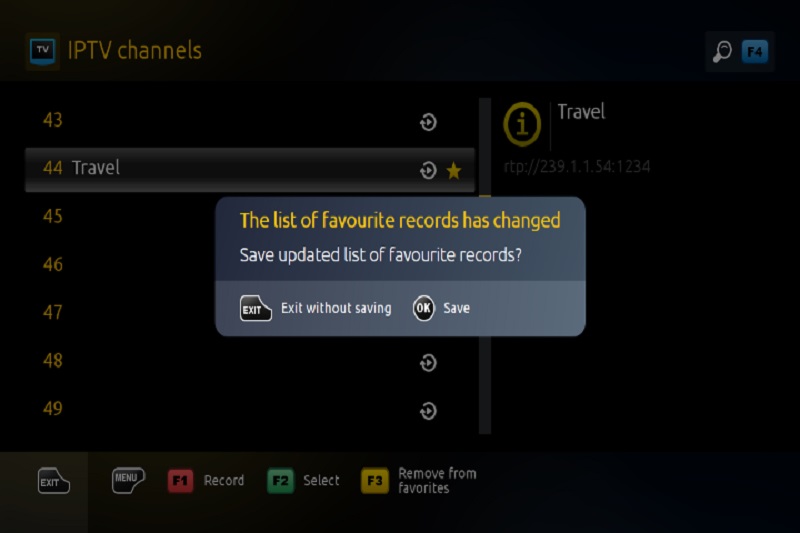
  • Via pressing F3 button on the remote control, select the channel – it marks in the list by a star.
  • Go to the next channel and identify it in the same way as explained above.
  • Furthermore, mark all the channels you need to be added in Favorites.
  • When exiting this section, the system reports that the Favorites list has changed.
  • After confirm to save (OK on the remote), the selected channels are permanently added to Favorites.

How to access the Favorites

Added to Favorites channels, become available from Home media.